Once you have developed the layout and entered geometric data for your model, you can specify flow rates. You have the ability to specify a unique flow rate for each cross-section. In addition, you can add up to three sets of flow profiles. Unique names can also be assigned to these profiles for clarity in the reports. For example, 10-year, 50-year, 100-year.
Cross-sections must first exist before assigning flow rates. To enter flows, click on the Flow Data tab at the top of the Input Grid to the right of your screen.
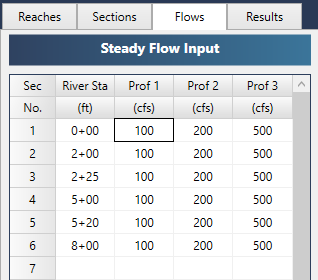
This table contains a listing of all available cross-sections, their River Stations and three separate columns for flow rates. Type in the flow rate for the first section and press the [Tab] key. The input box will drop down to the next section and will use the previous flow rate as the default input, saving you from having to retype the same value over and over. Flow rates may vary from one section to the next.
Apply Values
When finished, click the [Apply] button to accept.
Clear Values
If you need to make adjustments to an entire column of Qs, sometimes it’s best to clear out the column first and take advantage of the auto-default feature. To clear the flow inputs for any particular profiles, first click on any profile “column” on the table and then click the [Clear] button.
Profile Names
You may assign unique names for the profiles in the Project Settings. The names will appear on all output but will stay labeled as Prof 1, Prof 2 and Prof 3 on this input screen and Profile 1, Profile 2 and Profile 3 on the Compute tab.
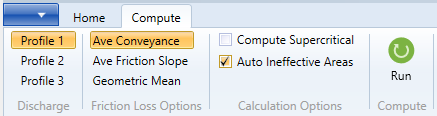
Now it’s time to compute your profile(s). Be sure to first set the starting water surface, tailwater, elevation at Section No. 1.