Once you have added the river reaches to your model, you can add the associated cross-sections. Again, we add these in sequential order starting at the downstream end working upstream. Sections should be added as looking upstream, at locations where there are any significant changes in the section shape, geometry or channel slope.
Also, Channel Studio automatically prepares a coordinate-based Plan map of your Model. If you want to produce a Plan Map that exactly follows the curvature of your Reach layout, please make sure your total cross-section widths do not increase or decrease by more than 10 percent from adjacent cross-sections. Otherwise the Plan Map will be constructed of straight line segments, which is okay. See Plan Drawings for additional information.
How to Add Cross-Sections
1. From the Model tab, click on the Cross-Section button on the side tool bar.
![]()
2. Move the mouse cursor over to the desired river reach location. Channel studio will automatically draw a section line perpendicular to the reach segment. When you have located the section at the desired river station, click your mouse button. A new section will be added and numbered accordingly. Repeat this process for additional upstream sections. Remember, the first Reach segment must contain at least one Section.
Note: You will have the ability afterwards to directly edit the Section’s exact station location on the Input Grid.

3. Click the Ok/Select button on the side tool bar or press the [Esc] key when done.
![]()
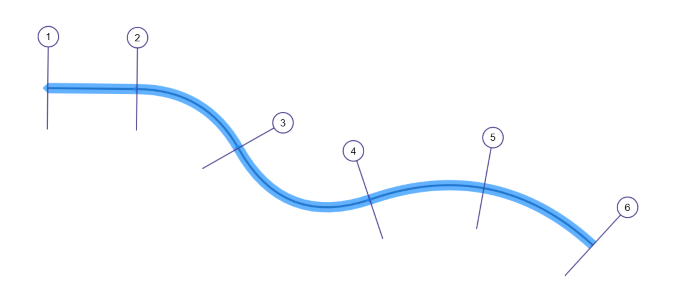
A typical model layout with cross-sections looks like this:
 Below is an example using a coordinate-referenced image background map.

Notice how the cross-sections lines span the entire floodplain.
Rules, Options & Tips
- Use the Slider bars on the top Ribbon Menu to increase or decrease the section line lengths and number labels. This helps to provide a suitable scale to match the canvas coordinates. Cosmetic only. This has no affect on the actual channel section widths.
- Also note that the Section Line length value on the Slider applies only to new cross-sections that have no data yet. Once you have entered the cross-section Station, Elevation data, the section lines will be drawn to their actual lengths.

- Use the Station Increment setting to automatically snap the section locations to pre-defined stations. For example, to easily add sections every 100 feet, select 100. The default is 1 ft. (m).

- Sections can be added or inserted in any order at any time. Channel Studio will take care of the numbering.
- For convenience, Channel Studio will automatically calculate the initial reach lengths between Sections based on the river reach stationing. However, you will have the option to override these values when inputting the actual cross-section geometric data. For example, the reach lengths of left and right overbanks and channel.
- To move an existing section upstream or downstream, double-click the Section line or its label circle. Then drag the section to the new location. Your mouse cursor will not need to be exactly on the label to move. In fact, it’s easier if the cross-hair is just above the label. Click the [Ok/Select] button or press [Esc] when done.
Delete a Cross-Section
Delete any cross-section by first selecting the Section line and clicking the Trash button on the side toolbar. Only one Section can be deleted at a time. Channel Studio will renumber the sections accordingly.
Avoid Overlapping Cross-Sections
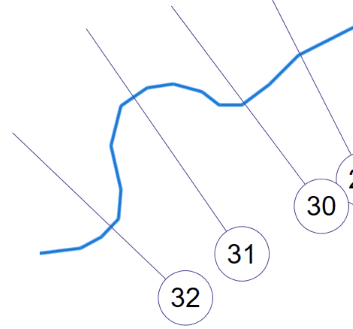
One of the benefits of using curved reaches is that it prevents section overlapping, eliminating the need to dog-leg sections. Channel Studio assumes cross-section cut lines to run perpendicular to the Reach on which it is located. Moreover, these cut lines must be straight. No dog legging. Whenever cross-sections intersect, the software will indicate the intersection point with a red circle as shown below.
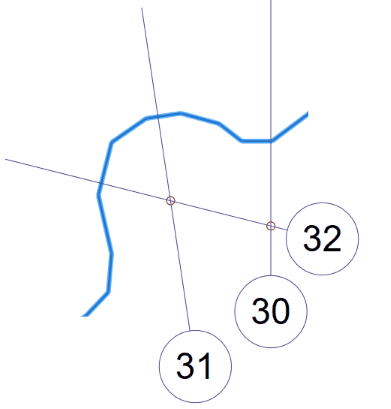
In the case above, the location of Sections 30, 31 and 32 should be re-evaluated.
Once you have added and located your Sections, it’s time to add their respective geometric data.