Stormwater Studio can import and export Hydraflow Storm Sewers version 8.0 .stm files including those exported by Autodesk® Civil 3D 2012 and later versions.
These files will have an .stm file extension. To import, choose, “Import Pipes from STM” from the Import/Export menu on the side toolbar located on the Plan tab.

Navigate to your STM file and click Open.

Round Trip from Civil 3D to Stormwater Studio
This import/export functionality offers a superb round-trip route to and from Stormwater Studio. You can develop your PipeNetwork in Civil 3D; export it by using the “Export to Storm Sewers” command within Autodesk Civil 3D. After that, import it into Stormwater Studio. Complete the design and conduct the hydraulic analysis. Finally, export it back to an STM that can be used to update the original Pipe Network in Civil 3D.

First, Set Part Matching Defaults for Migrating Pipe Network Data
Before migrating pipe network data between Autodesk Civil 3D and Stormwater Studio, it is essential to first establish part matching defaults in Civil 3D. By setting these defaults, you can select your specific Civil 3D part types that will directly correspond with valid pipe and structure types in Stormwater Studio. You only need to carry out this procedure a single time. Here’s how to do it:
- In Civil 3D Toolspace, on the Settings tab, right-click the Pipe Network collection and select Edit Feature Settings.
- In the Edit Feature Settings – Pipe Network dialog box, expand Storm Sewers Migration Defaults.
- For the Part Matching Defaults, click the Browse button […] in the Value cell to display the Part Matchup Settings dialog box.


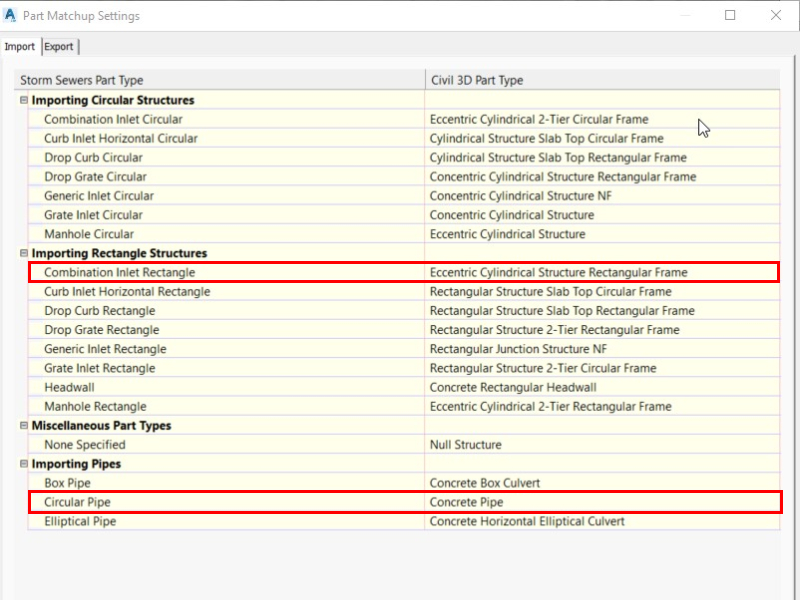
4. Match the Storm Sewers Parts to the Civil 3D parts.
Above is an example Civil 3D Import migration setting. Per these particular settings, when the STM file contains Combination Inlet with a Rectangular Structure, Civil 3D will import it as an “Essentric Cylindrical Structure Rectangular Frame”. Likewise, a “Circular Pipe” in the STM file will get imported into Civil 3D as a “Concrete Pipe”.
Export settings should be identical to the Import settings, but reversed. So that when your Pipe Network in Civil 3D contains a “Essentric Cylindrical Structure”, it will get exported as a “Circular Manhole”, per the above migration settings.
To summarize, the Import/Export settings are simply used to match Parts from Civil 3D Part Catalog to equivalent parts in the STM file. Stormwater Studio will in-turn match-up parts on its end as it uses identical inlet and junction types. More information on how to set these defaults in Civil 3D can be found in this article.
Once you have completed the part matching settings, follow this procedure to transfer your existing PipeNetwork from Civil 3D to Stormwater Sudio and back to Civil 3D.
1. Export from Civil 3D – In Civil 3D, navigate to the Output tab on the ribbon menu, click the Export panel, and select Export To Storm Sewers. In the dialog box that appears, choose the pipe network to export. Then specify the save location and filename for your .stm file, and click OK to complete the export. Note that you must choose entire pipe networks. You cannot export individual parts. This step will utilize the Export Part Matchup setting.
2. Import into Stormwater Studio – In Stormwater Studio, choose, “Import Pipes from STM” from the Import/Export menu on the side toolbar located on the Plan tab. Navigate to the .stm file you exported from Civil 3D and click Open.
3. Perform the design and analysis in Stormwater Studio – Feel free to save the project as a Stormwater Studio (.sws) file in the interim.
4. Export from Stormwater Studio – Once your design and analysis is completed, choose, “Export Pipes to STM” from the Import/Export menu on the side toolbar located on the Plan tab. In the Save As dialog, enter a new name or use the existing name and click Save. Be sure to add a Project Name at the lower left corner of the Main Window. This will be referred to by Civil 3D as the PipeNetwork Name.

5. Import into Civil 3D – In Civil 3D, click Insert tab. Then click the Import panel and select “Storm Sewers”. In the Import Storm Sewers File dialog box, navigate to your exported .stm file in Step 4, select and then click Open. This step will utilize the Import Part Matchup setting.
You will be prompted to either update the existing pipe network, create a new pipe network. Chose the Update option and changes made in Stormwater Studio will be reflected in Civil 3D according to the import settings from your Part Matching Defaults.
“Use Imported Part Id for Part Family” Setting
You might have noticed above that a Circular pipe in STM and Stormwater Studio is the equivalent to a “Concrete” pipe in Civil 3D. That’s because neither Storm Sewers nor Stormwater Studio differentiate pipe materials. After all, it’s the n-value that counts, right? But what if you were using HDPE pipe in your CAD drawing? That will not match in the STM specification and will aways translate to Concrete. This is where the “Use Imported Part ID for Part Family” comes into play.

When set to “Yes”, Civil 3D utilizes the Part ID present in the STM file (for Storm Sewers) first. If the Part ID cannot be located it will use the conventional Part Matching Defaults. Conversely, when disabled (set to No), it adheres to the conventional method, depending entirely on the Part Matching Defaults for all Part Family assignments during the import process.
Parts Catalog Entries are Preserved
Fortunately, Stormwater Studio preserves the originating Line and Junction Parts (IDs and Descriptions) that were included in the Civil 3D export. For example:
“Line Part ID = “,”F5A958B6-07B2-474A-9A64-6819CAB0DFE1”
“Line Part Description = “,”AeccCircularHDPEPipe_Imperial”
“Junction Part ID = “,”112AAC17-CBCB-4B43-838A-2B38C17B3ABC”
“Junction Part Description = “,”AeccStructTwoTierRectBase_Imperial”
So if the “Use Imported Part Id for Part Family” option is set to “Yes”, the exported HDPE pipe will remain an HDPE pipe on the trip back.
Stormwater Studio not only imports these Parts, it will save them in its own .SWS project file. If, for example, you imported an STM that contained Parts; then saved that file as a Stormwater Sudio (.sws) file; opened it later and then exported it to an STM; that STM will contain the original parts.
Note that while working in Stormwater Studio on an STM imported project, new Parts will not be generated and assigned if you added new Lines or changed a Junction type of any existing Line. If you change a Junction or Pipe, the original Part will remain as-is.
Additionally, if you inserted a new junction to a Line using the “Insert Junction” tool at the Plan tab, Stormwater Studio will assign a Line Part identical to the Line that took the insertion. But it will not assign a Junction Part. It will be blank. In these cases you can assign them back in Civil 3D. But if you have set the Part Matching Defaults as described above, Civil 3D will assign these new parts accordingly on the trip back per your Import Part Matching Settings.
View Parts in the Custom Report
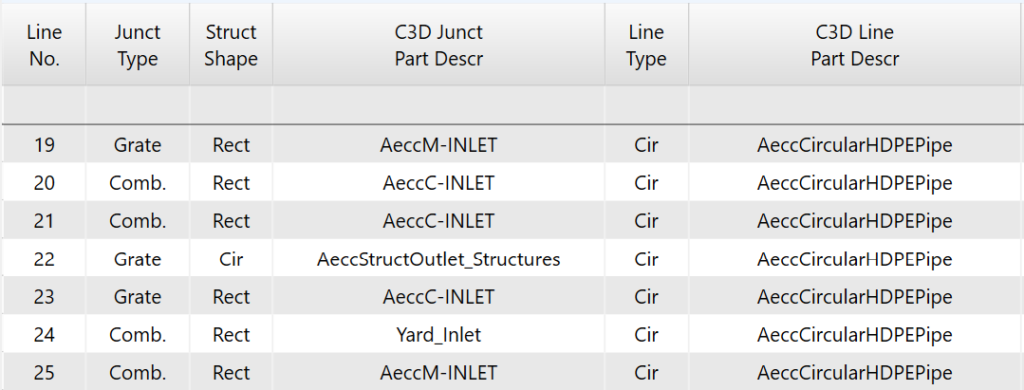
If you feel the need to verify the Part matchups in Stormwater Studio, you can easily add these fields to the Custom Report and view them on-screen in the Reports tab. Below is an example Custom Report showing a Stormwater Studio project’s Junction Type, Shape and Line Type with matching Civil 3D Line & Junction Parts.

Network Name Preserved
When you export your PipeNetwork from Civil 3D, The PipeNetwork name will be included in the STM file. This name will import into Stormwater Studio as the Project Name and can be found in the lower left corner of the Stormwater Studio main window as shown below.

It is important that you do not modify this name as it will be used to “Update” this PipeNetwork back in Civil 3D.
