Below is an excerpt from a Drainage criteria manual in Shelby County, Tennessee. Many others are following suit.
“The required detention volume shall be that volume necessary to attenuate the post- development mass outflow of water from the outlet structure from hour 11 to hour 18 of the 24-hour storm to a level not to exceed the pre-development mass outflow for the same time period for both the 2-year and 5-year, 24-hour storms. This volume may be minimized by careful attention to outlet structure design.“
Thankfully, Hydrology Studio has built-in functionality that allows you to meet such criteria. You can easily build a multi-purpose detention basin outlet structure that satisfies both peak release rate and volume restriction criteria described above. It requires minimal inputs and offers a fast and easy path to design success.
The Problem
As you may have read throughout this Help Center, there are problems with traditional detention ponds that focus only on preserving pre-developed peak flow rates. But in many instances this requirement has proven to be insufficient in maintaining flood flow stages downstream due to the increased volume of the post-developed hydrograph, i.e., the detention pond’s outflow hydrograph.
Many communities have experienced flooding problems due to development, even with peak flow rate detention systems in place. They stem from an increase in hydrograph volume, particularly from the more frequent events, like the 2, and 10 year storms.
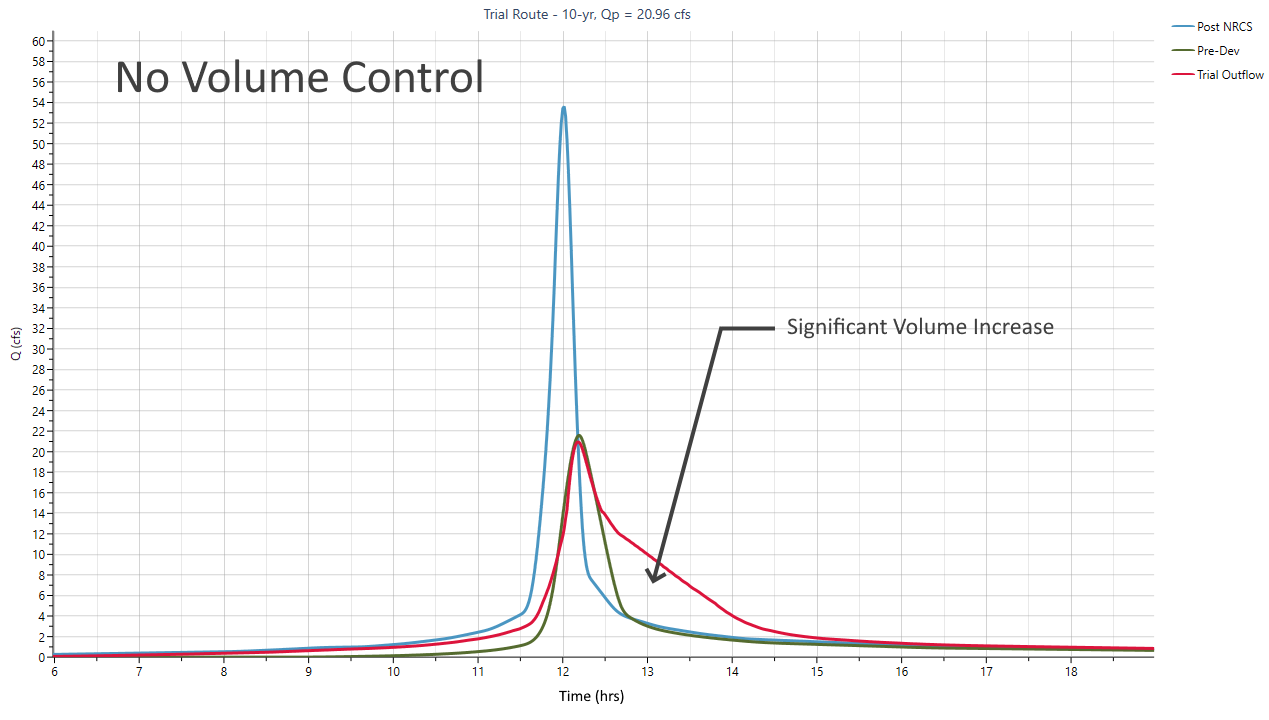
The chart below shows a typical detention pond routing using Release Rate as its only criteria. As you can see, the outflow hydrograph (red) has far more volume than it’s associated pre-developed hydrograph (green). Most of it occurs on the receding side, after the Post developed hydrograph has peaked. It is this added volume that is “The Problem”.
The Solution
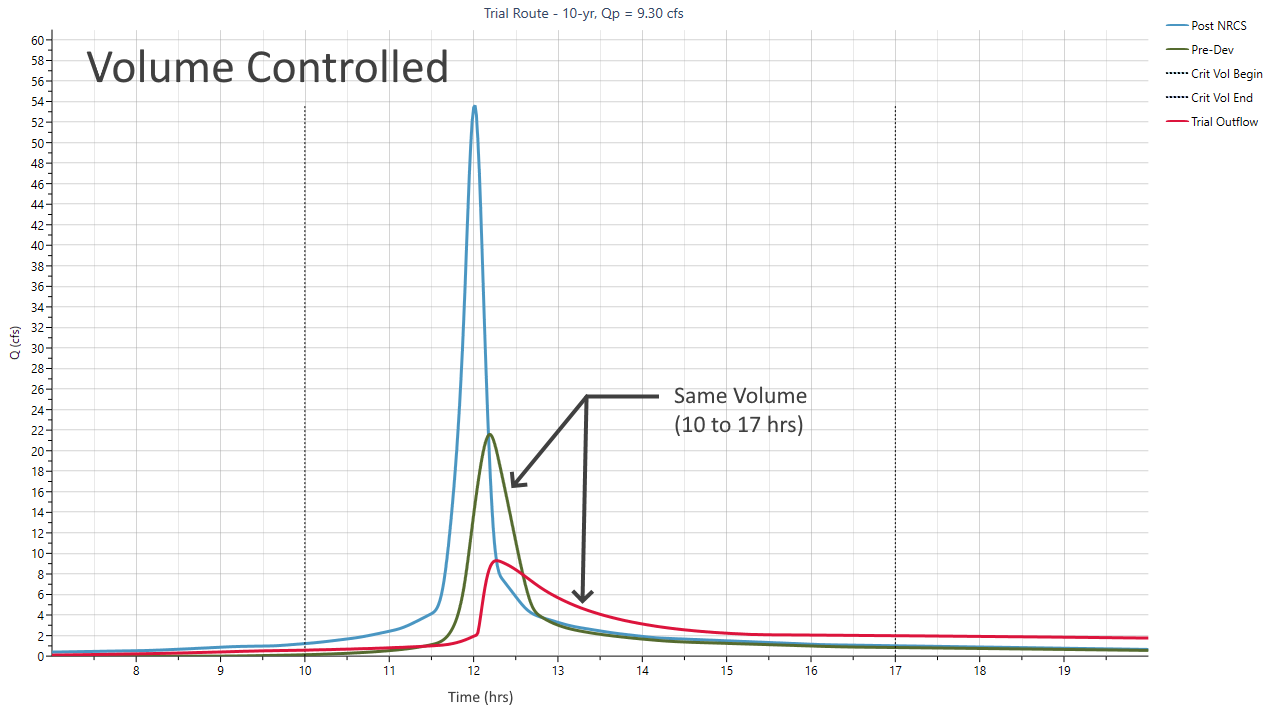
There is a new criterion coming on the scene and it’s based on studies that reveal this volume increase occurs during a certain “Critical Time Span”. And that if we could restrict the post-development volume during this time period to that of the pre-development volume during that same time period, we could prevent rising flood stages downstream as well as other adverse effects of urban development.
This critical time span typically begins at hour 11 and runs to hour 18 on a common 24-hour design storm analysis.
This critical time span typically begins at hour 11 and runs to hour 18 on a common 24-hour design storm analysis. Some municipalities and drainage authorities have already adopted this measure with times ranging from 10 to 17 hours and 11 to 18 hours.
All that is need by the designer is an adjustment to the outlet devices so that the net volume difference between the pre-developed and the pond’s outflow hydrograph is at or near zero. Hydrology Studio has made achieving this just as easy as designing for peak flow rates.
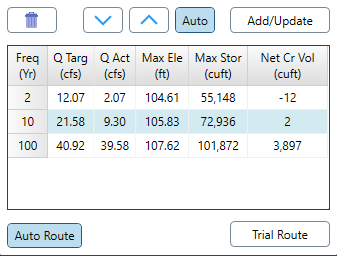
To recap, you can basically forget having to meet peak flow criteria for the lower storm events and focus on the net increase in volume over the critical time period instead. It’s referred to as “Net Critical Volume” in the software. Meeting the volumetric detention criteria typically satisfies the peak flow target(s) as well. Only for the higher storm events, like the 100-year, will you need to satisfy the peak flow restriction.
Good News, Bad News
The bad news first… your new detention ponds are going to get larger. Sorry! You can expect about a 15 to 25 percent increase from the Target Q based pond volumes. Your mileage may vary however. In the case above, the pond increased in volume by about 25 percent, from 82,000 to 102,000 cuft. Environmental preservation has its price.
The good news is that this is an easy criteria to design for. It’s really no different than designing 2 and 5 year outlet structures (orifices usually) to meet their peak flow rates. In Hydrology Studio, you can simply make adjustments to your low flow devices while performing your Trial Routing, until the Net Critical Volume is at or near zero. These values are shown on the Trial Route Results table along with the Q target numbers to serve as your guide.
More good news is that there is no WQv, CPv, Drain Times, etc. to deal with.
How to Design Using Volumetric Detention
To activate this functionality, set the Critical Time Span in the Project Settings. That’s all you need to do. Hydrology Studio manages the rest. And you’ll obviously need to have both Pre- and Post-development hydrographs to compare volumes.
Also note that this option can only be utilized when using NRCS hydrographs and 24-hour design storms. You cannot use the Rational method for this. Additionally, if you do not plan to utilize this feature, set the Critical Time Span to 0,0.
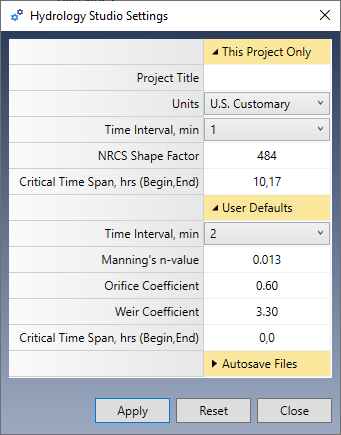
Open the Project Settings from the Main Window. You’ll then see two rows where you can specify the Critical Time Span. The initial defaults are “0,0” which disables this feature. To enable this functionality, you must enter beginning and ending times for the span under the “This Project Only” row header.
All entries under the User Defaults category will be used when starting a new project. The category “This Project Only” uses those settings only for the current project and will be saved with your project file(s). To set the Critical Time Span, type in the beginning and ending times separated by a comma. For example, “11,18” sets the span from 11 hours to 18 hours. If you created runoff hydrographs prior to setting/resetting the Critical Time Span, recompute each hydrograph afterwards.
Selecting the Time Interval
The Time Interval chosen can make a slight difference in calculated volumes. The smaller the Time Interval, the more accurate the computed volumes will be. A 1-minute Time Interval is recommended for maximum accuracy.
Click [Apply] to accept. Click [Close] to return to the Main Window. You have now activated this feature. Reset back to “0,0” to deactivate.
Use the Trial Route Feature
Going forward you will have an additional column in the Trial Route Table in the Pond Wizard as shown above which automatically calculates the Net Critical Volume (difference between the pre-developed and pond outflow hydrographs between the Critical Time Span). In order for the software to track this volume you must specify a pre-developed hydrograph at Step 1 – Estimate Required Storage in the Pond Wizard window. This step cannot be skipped.

The procedure is exactly the same as sizing outlet devices for peak release rates. You’ll simply adjust your outlet size to where the Net Critical Volume is at or as close to zero as you can get while performing trial routings.
See, Using the Trial Route Feature for more information. Note that this method generally requires more pond volume (as much as 25%) than that for peak flow criteria. You may need to back-up to the previous step, “Create Pond”, and make adjustments to your pond during this process.
You’ll also see Critical Time Span indicators (vertical dotted lines) on the Estimate Storage and Trial Route plots confirming the functionality is active.
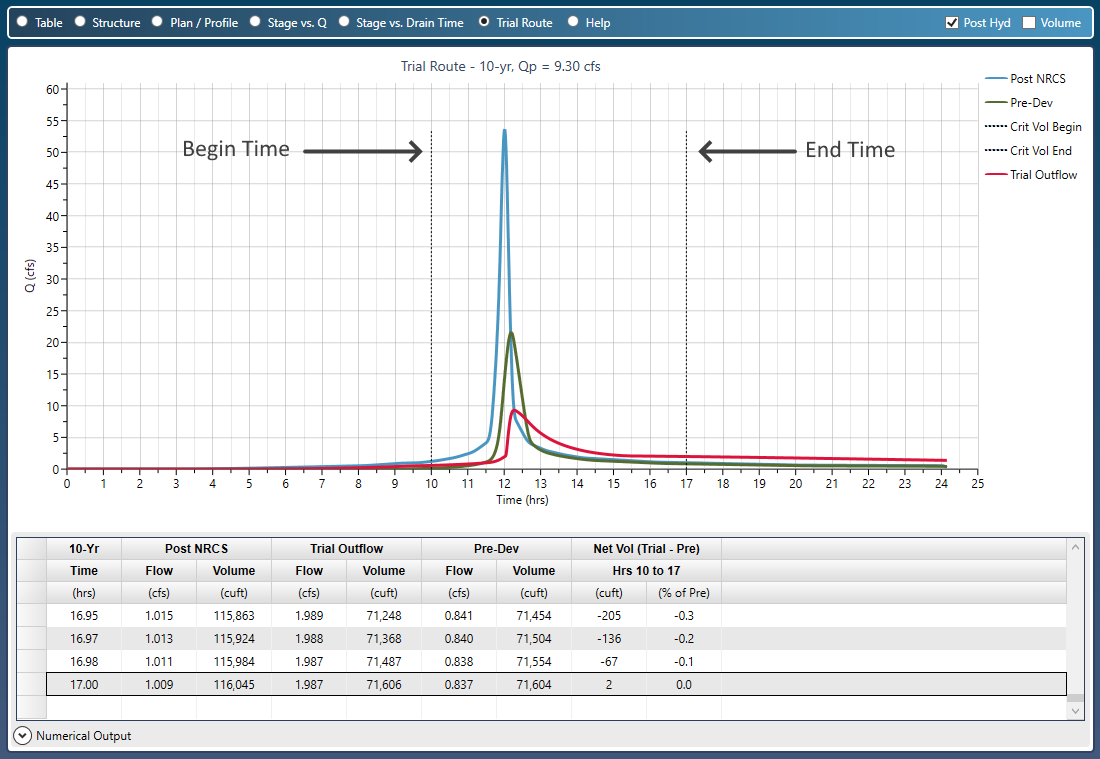
Click the Numerical Output expander bar at the bottom to expose the volume calculation results at each time increment within the Critical Time Span.
Reporting
When the Critical Time Span settings have been activated in the Project Settings, you will be able to view the following outputs:
- Critical Volume column on the Table tab.
- Critical Time Span indicators (vertical dotted lines) on all hydrograph plots.
- Critical Volume column on the printed Hydrograph Summary report.