Reach routing becomes necessary when your inflow hydrograph must travel through a substantially long and well-defined channel where the channel storage is expected to have a significant impact on attenuation of the hydrograph.
In many cases where the channel is small, less than 5 feet in width and/or has a travel time less than the Time Interval used, it will not be necessary to perform a channel route. Instead, include this as a flow area within a subcatchment.
When the inflow hydrograph traverses the entire channel in a duration shorter than the Time Interval (typically one to two minutes), it is advisable to incorporate that section of the channel into the drainage subarea of the runoff hydrograph and the Tc calculations, while omitting the channel reach routing.
To route a hydrograph, select the inflow hydrograph first by dragging a rectangle around it with your mouse or alternatively, click on the icon. Then click the [Reach] button on Ribbon Toolbar.

A Reach icon will be added to your model.
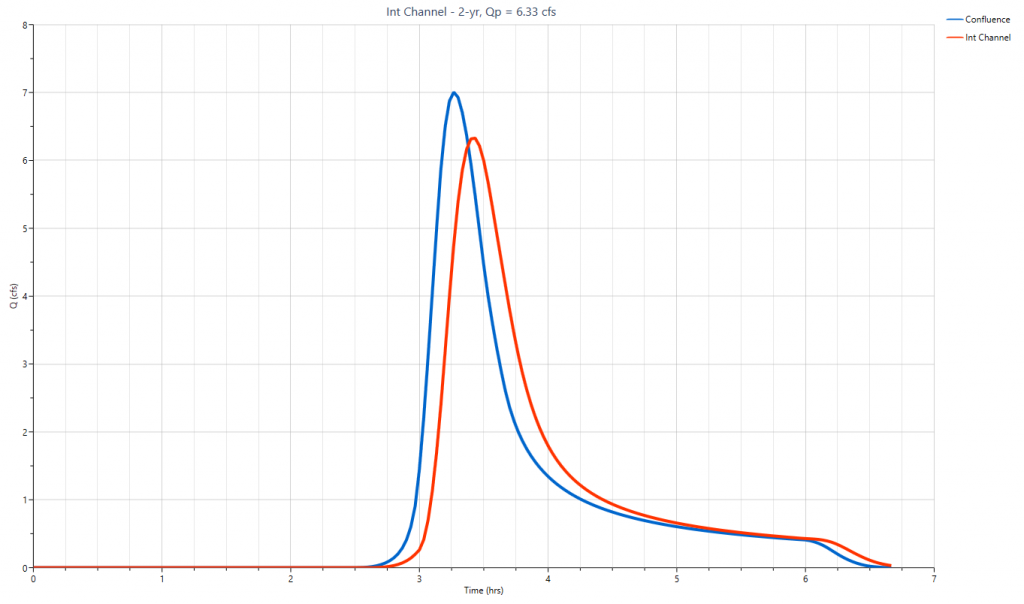
For example the following model shows Hydrograph 4 “Junct” was selected as the inflow to a channel Reach, Hydrograph 5 “Reach”.
 Next, click on the Reach icon to populate its input window.
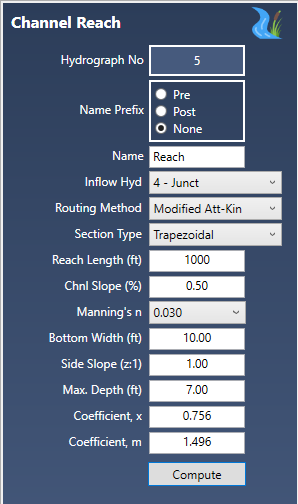
Required Data
The following is a description of each of the required input items.
Name Prefix
You can include a prefix (“Pre”, “Post” or nothing to your hydrograph Name field with a single mouse click. This saves precious keystrokes when doing a pre- and post-development study and you want to identify those hydrographs that are “Pre” or “Post” development. The chosen prefix will be added to the front of the Name label on the Basin Model and throughout the software, for example, Tables, Charts, Reports, etc.
Name
Enter any descriptive name for this hydrograph. It will appear on the printed reports as well as the Basin Model.
Inflow Hydrograph
The inflow hydrograph has already been selected but can be edited at any time by re-selecting from the drop-down list.
Keep in mind you can only select hydrographs that have numbers lower than your Reach Hydrograph number. As you progress downstream, hydrograph numbers must increase. The program automatically manages this numbering system to ensure the accurate construction of the routing schematic.
Routing Method
Select your preferred calculation method from the drop-down list box. Your choices include Modified Att-Kin and Muskingum-Cunge. The Muskingum-Cunge method tends to give higher peak flow values than the Modified Att-Kin. See Computational Methods for more information.
Section Type
Select the type of section that best describes this channel section:
- Trapezoidal
- Rectangular
- Triangular
- Circular
- Known x/m
Circular or pipe sections that flow full or higher are not recommended for this procedure. It is highly probable that detention storage would occur upstream and therefore would require a storage-indication reservoir “Pond” routing procedure. In addition, Circular sections are not available when using the Muskingum-Cunge method.
In the rare case that you want to directly enter known x and m values, select “Known x / m”. The remaining section data will not be required.
Reach Length
The total length of the reach.
Channel Slope (%)
The slope of the channel in percent, i.e., ft(m)/100 ft
Manning’s n
Select a roughness coefficient from the drop-down list. See Useful Tables for a look-up.
Bottom Width
Enter the width of the channel bottom. This is zero for Triangular sections. Note that the Modified Att-Kin method has a minimum bottom width of 5 feet.
Side Slope (z:1)
Enter the side slope of the channel in the ratio form, z (horizontal) to 1 (Vertical). Zero for rectangular sections.
Maximum Depth
Enter the full-flow depth of this channel. Not required for circular pipes or Muskingum-Cunge method.
Coefficients x & m
This input section should be skipped for all section types other than “Known x/m” as well as the Muskingum-Cunge method. For “Known x/m enter the x and m values here. For more information on the x and m coefficients, see Computational Methods.
Click [Compute] when finished.