In Studio Express, each hydrograph you create is calculated for the selected frequency at the Hydrology input grid using the design storm and precipitation values entered at this screen. You only need to do this once.
Like the IDF curves, you can save the values as an event file for loading at a later time. Similarly, these files are automatically saved when you exit the program and reloaded upon its start. These files become part of all project files. Thus it is not necessary, for example, to email an associate, the .stx project file and the associated event file. Similar to the IDF file, it’s already embedded in the .stx project file.
Built-in Design Storms
Studio Express has a library of built-in design storms to suite your local criteria, from which you can pick and choose at any time. Their names are listed on the Precipitation Manager screen.
| Storm Name | Duration (hrs) | Description |
|---|---|---|
| Type I, IA, II, & III | 24 | Dimensionless distributions developed by NRCS using Weather Bureau’s Rainfall Frequency Atlases for different geographic regions. |
| Type II Fla Mod | 24 | Type II modified for parts of Florida. |
| NRCS Standard | 6 | Dimensionless distribution developed by NRCS for a shorter, 6-hr duration. |
| Synthetic, IDF-based | 1, 2, 3, 6 12 & 24 | Dimensionless distribution is automatically developed using current IDF curves and symmetrically arranged rainfall depths. |
To begin, click the [Rainfall] button on the Main Window Ribbon Toolbar to open the Rainfall IDF Wizard.

Select the “Precipitation” tab on the Ribbon Toolbar. The Precipitation Manager screen should look like the following:
This screen basically needs to know two things:
- Which storm distribution you want to use
- Rainfall precipitation amounts associated with Item 1
1. Select a Design Storm Distribution
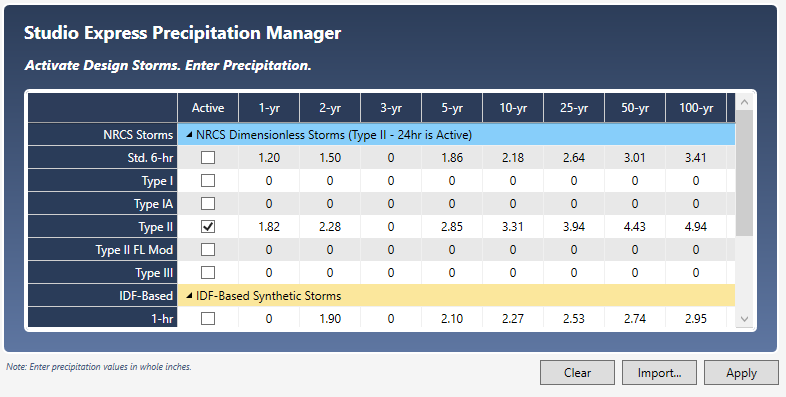
To activate a distribution, simply click its corresponding check-box under the “Active” column. To use the Type II, for example, check the box in the Active column next to Type II as shown in the screen above. Only one storm can be active at a time.
2. Enter Rainfall Precipitation Amounts
The next step in setting up your Precipitation & Events is specifying the rainfall amounts local to your area. Note that this step is not required when using IDF-Based storms. Their values are computed and entered automatically.
There are three ways to accomplish this:
- Download a ready-made .pcp file from RainMaps™
- Enter the rainfall amounts manually on this table
- Import from NOAA’s National Weather Service “Precipitation Frequency Data Server”
To enter manually, simply type in the rainfall amounts associated with the selected design storm and frequencies. When finished, click the [Apply] button.
A sampling of NRCS Type II precipitation amounts is shown in the screen above.
Save your curves by clicking the [Save] button and specifying a name for your file. A “.pcp’ extension will applied. This file will automatically open each time you launch Studio Express. You can change this file any time afterwards.
Done
Simply close this screen and return back to the main window. There’s nothing else you need to do. From this point forward, each NRCS runoff hydrograph you create will automatically use this rainfall data and design storm. There’s no need to re-enter this data. You can, of course, return to this screen at any time to edit and choose other design storms. Click the [Open] or [Save] buttons to open or save an existing .pcp file.