This feature allows you to adjust the contours as well as the manually inputted storages of your pond, either increasing or decreasing them as needed. This functionality is particularly beneficial for new designs, where an initial pond size was established, only to discover later that the freeboard is either too high or insufficient. With this feature, you can easily modify the contours and storages in increments of +/- 1 or +/- 10 percent with single mouse clicks, ensuring the optimal size for your new pond.
Example
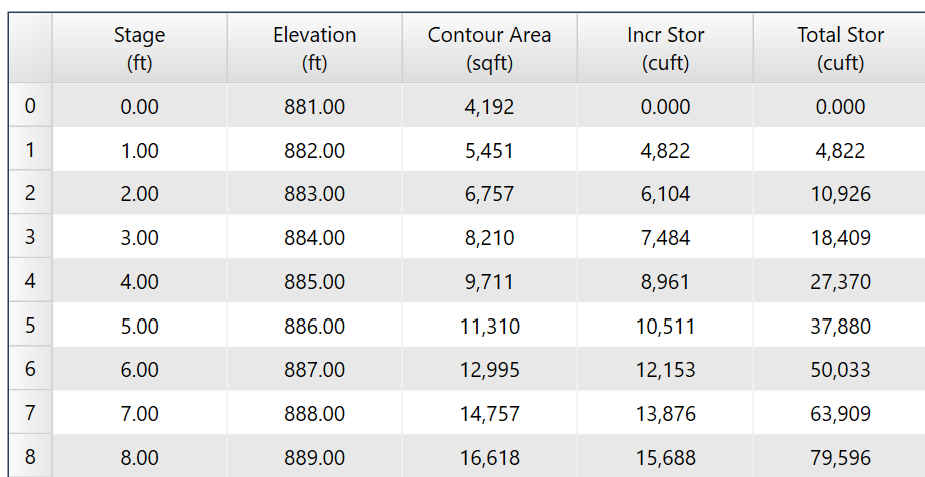
Below is a table of contours brought in from a preliminary design. The total storage is 79, 596 cuft. Below that is the resulting pond structure outlet design indicating the 100-year water surface elevation after a Trial Route.
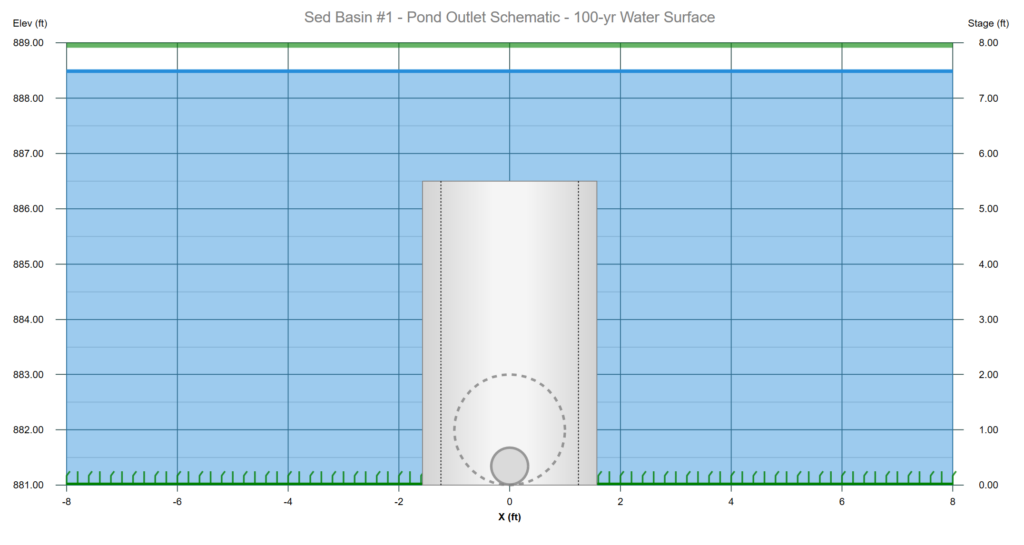
In this case the pond is too small to accommodate a 1-foot freeboard and we are at the Q-out limit. We need to increase the pond size to increase the freeboard. This can be accomplished by returning to the Create Pond Step and increasing the storage. But rather than editing each contour, (or storages in the Manual Pond) we can save time by utilizing the software’s Scale feature.
How the Scale Buttons Work
The software provides two buttons; one to decrease and one to increase. Each click will increase or decrease the Contours (or Manually-inputted storages) by a scaling increment which is approximately 1 percent of the original. Holding the [shift key] while clicking increases the increment from 1% to 10%. Note that this procedure does not affect the total depth of the pond, only the incremental storages and contours.

Pressing the Up button and then the Down button will revert to the initial data. When you are content with the level of scaling, click the [Apply Contours] button to confirm your selection. Please be aware that after you click Apply, you will not be able to revert to the precise original data, as the scaling increments will have been altered. The scaling increments are computed as the value of each contour x 0.01, then converted to an integer. So each Contour will have a unique increment but the pond will reshape uniformly, preserving the total depth.
Back to the Example…
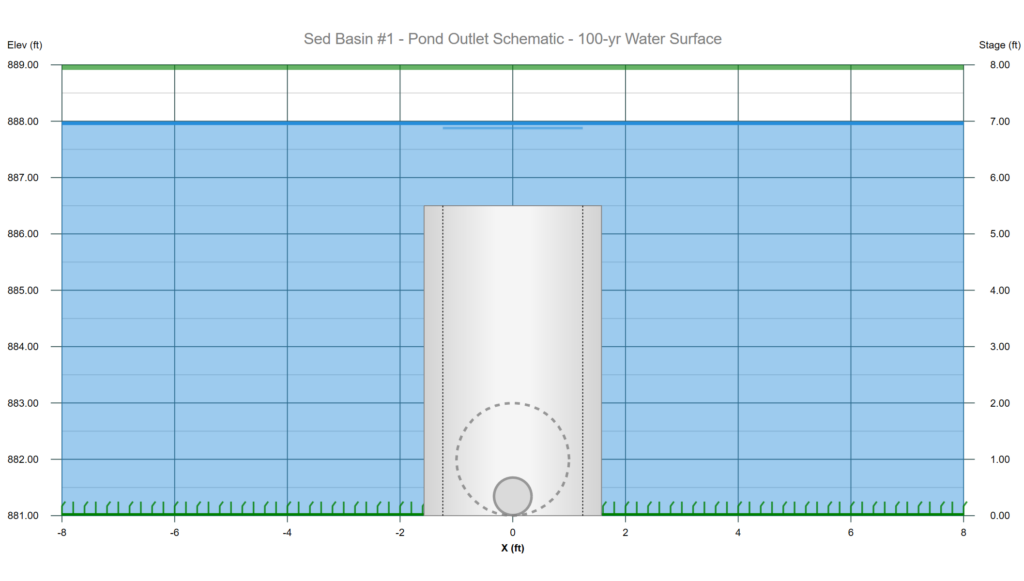
Because our freeboard is short, we will try to increase the pond by approximately 20 percent. We do this by clicking the Up arrow button while holding the [Shift] key on our keyboard, two times. You’ll notice that each Contour was increased by about 20 percent resulting in the following adjusted Table where the total storage is now 95,536 cuft.

To accept these adjustments, be sure to click [Apply Contours]. Then return to the Outlet Structures step and re-compute a Trial Route. As shown below, the freeboard increased to 1 foot.
By using the scaling functions we were able to optimize the size of our pond with only a few mouse clicks. It’s not too large, and not too small. This feature can also be used to minimize the pond size when the initial, preliminary pond design was simply too large, producing too much freeboard.