By now you probably have Hydrology Studio installed but just in case you haven’t, follow the purchase/download instructions at the product’s website. You will simply click an [Install] button and click [Run] or [Open] depending on your browser.
The initial download will install the free Trial version which has no time limit but limited functionality. For example, you won’t be able to save project files; and most of the reports will be watermarked.
Hydrology Studio uses Microsoft’s “Click-once” technology which makes the installation process fast and easy. Once you have downloaded/installed the software as described above, a desktop icon will be automatically created and will launch the program.
Again, this installs the Trial version. From there you’ll need to register, or activate, the software using your purchased license key. This turns the Trial version into a full working version. See “How to Manage Your License” for complete details.
Security Measures
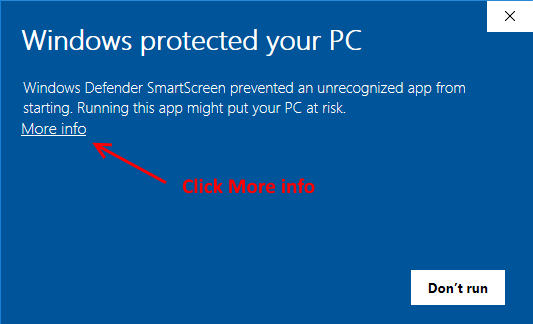
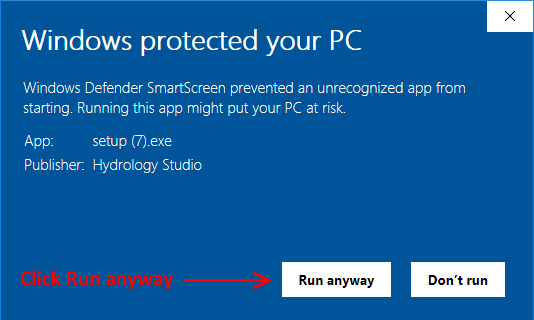
Our software code is digitally signed and secured using the latest signature algorithm sha256RSA insuring that the software you download here is authentic and untampered with. However, on occasion you may initially see the following screen during the installation. If so, click the “More info…” link and then click [Run anyway].
My Click Once Security Trust Prompt is Never Displayed
The message “your administrator has blocked this application because it potentially poses a security risk to your computer” is shown with no option to trust the application. If this occurs, then your Trust Prompts have been disabled for some reason. Here’s a way to check it out and set it.
Visit: https://www.smartlux.com/software/trust-prompt-tool/
Download and run the Trust Prompt Tool.
When it starts it will display your current Trust settings. Do they look like those shown below? If not, set the switches as shown below.
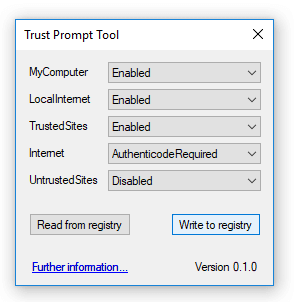
Then click [Write to Registry] and retry the install.