Hydrology Studio automatically checks for program updates, revisions and fixes each time you exit the software. Then, on the next launch, if an update is available you will be prompted to update. You may choose to “Update” then or “Skip” and wait until a later time.
If you choose to skip the update, you will not be prompted again until the next update is released. Thus it is highly recommended you click Ok rather than Skip.
If an update is available, you’ll see a screen similar to this:

Click [Ok] to immediately download the update. It will only take a few seconds and then your new version will launch. There’s nothing else you need to do.
To learn what’s new in the update, please visit Updates and Release History.
Security Measures
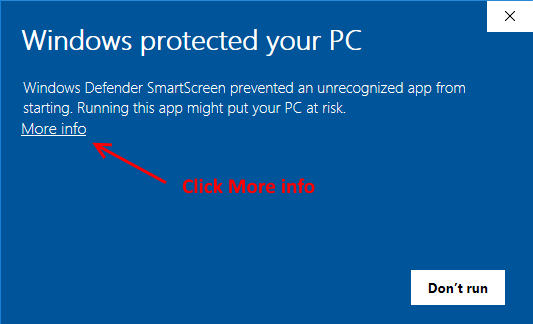
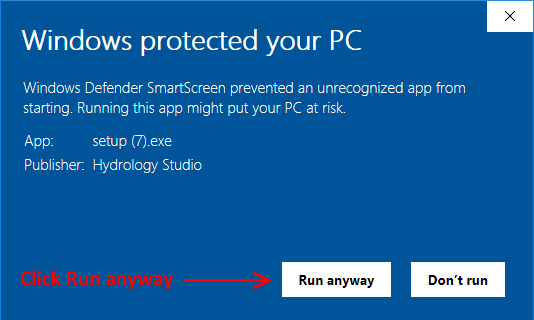
Our software code is digitally signed and secured using the latest signature algorithm sha256RSA insuring that the software you download here is authentic and untampered with. However, on occasion you may initially see the following screen during an update. If so, click the “More info…” link and then click [Run anyway].
Update history including dates, version numbers, new features and bug fixes can be found here.
Hydrology Studio has Stopped Working
On occasion, Hydrology Studio updates may get blocked by antivirus software or get corrupted by a Windows update. When this occurs, the program may not run after the update and you’ll see a message that the program has stopped working, an “Index Out Of Range” message, or the program suddenly closes.
If this happens, simply uninstall Hydrology Studio from “Add/Remove Programs” in your Windows Control Panel. This will not affect any of your existing project files.
Then re-download the new version directly from Hydrology Studio’s website by clicking on the link below. No need to log-in.
A second option is to delete the download history. Follow these steps:
1. Uninstall Hydrology Studio (Only if you see an icon on your desktop).
2. Then delete the application history folder by following these instructions:
In Windows Explorer navigate to: C:\Users\yourusername\AppData\Local\Apps\2.0.
Please note that this folder is hidden by default, so you’ll need to show hidden files and folders in the Windows Explorer Folder Options dialog.
You’ll then find folders with names like Data and random names like, AP3HP63D.QRD. Delete all of these folders so that \Apps\2.0 is empty. Then re-install Hydrology Studio from the link above.
If the problem persists, please check with any antivirus programs you may have running as they might be blocking some files from being updated. You can try temporarily disabling the antivirus program or inspecting the program’s settings and possibly “White-listing” Hydrology Studio.