The fastest way to set the frequencies and the design storm you wish to use is on this Rainfall tab accessible from the main window. It only takes a few mouse clicks. Here’s how it works:

Simply activate and deactivate (check/uncheck) the return periods you want to use. Then select your NRCS design storm from the drop-down list. That’s all you need to do. All subsequent hydrographs will be computed using these settings.
Those who need to perform a Critical Storm Duration analysis will find this feature very useful. Here you can select a design storm; run your basin model; view/print the results; and repeat choosing other design storms until you have achieved your objective.
Using The Rainfall Wizard
Each time a hydrograph is created or computed, the software uses the rainfall that is entered in this step. It computes your model for all “Active” return periods at the same time. There’s no need to rerun your model for each frequency. There’s very little for you to do once it is set up for your locale. This rainfall data is automatically loaded upon each program launch.
Here is what you need to do:
- Activate or deactivate the Return Periods you want to use, 2, 10 and 100 year for example
- Select the Design Storm, for example, NRCS Type II
- Enter directly, import or use RainMaps to setup the rainfall precipitation amounts
Each step is explained in detail below.
Like the IDF curves, you can save the values as an event file for loading at a later time. Similarly, these files are automatically saved when you exit the program and reloaded upon its start. These files also become part of all project files. Thus it is not necessary, for example, to email an associate, the .hys project file and the associated event file. Similar to the IDF file, it’s already embedded in the .hys project file.
Built-in Design Storms
Hydrology Studio has a full library of built-in design storms, including 10 that you can customize to suite most any criteria, from which you can pick and choose at any time. Their names are listed on the Precipitation Manager screen as well as the Rainfall tab on the main window. Their full detailed hyetographs can be viewed from the “Design Storms” tab. The library also includes the latest NOAA Atlas 14 Design Storm Distributions.
| Storm Name | Duration (hrs) | Description |
|---|---|---|
| Type I, IA, II, & III | 24 | Dimensionless distributions developed by SCS using Weather Bureau’s Rainfall Frequency Atlases for different geographic regions. |
| Type II Fla Mod | 24 | Type II modified for parts of Florida. |
| SCS Standard | 6 | Dimensionless distribution developed by SCS for a shorter, 6-hr duration. |
| Synthetic, Nested, Balanced, IDF-based | 1, 2, 3, 6 12, 24 | Dimensionless distribution is automatically developed using current IDF curves and symmetrically arranged rainfall depths. Also known as Balanced Storm. |
| Huff, ISWS Bulletin 75, Quartiles 1, 2 & 3 (10 sqmi) | 1, 2, 3, 6, 12, 18, 24 | Developed from ISWS Bulletin 75. Used primarily in the Midwest. |
| Custom | User-defined | A user-specified dimensionless storm. Up to ten unique storms can be entered and saved for future use. |
| Huff Indiana. Indianapolis, Evansville, Ft Wayne, S Bend, Quartiles 1, 2 & 3 | 0.5, 1, 2, 3, 6, 12, 24 | Huff curve dimensionless ordinates, Indiana LTAP 2015 |
| NJDEP Water Quality Storm | 2 | New Jersey 2-hour, 1.25- inch water quality distribution |
| NRCS MSE (1 thru 6) | 24 | NOAA Atlas 14, Midwest and Southeast, U.S. |
| NOAA (A, B, C, D) | 24 | NOAA Atlas 14, Ohio Valley and neighboring states |
| NRCC (A, B, C, D) | 24 | NOAA Atlas 14, Northeast states |
| CA (1 thru 6) | 24 | NOAA Atlas 14, California |
| FDOT (Florida DOT) | 1, 2, 4, 8, 24, 72 | Rainfall distribution curves from the FDOT Drainage Manual |
| SFWMD | 72 | South Florida Water Management District 72-hour distribution |
| Austin, TX Zones 1 & 2 | 24 | City of Austin HEC-HMS Frequency Storm |
My Storm Isn’t Listed
If you don’t see a design storm that you wish to use from the library, you can enter it in (or import the data) as a Custom Distribution. See Custom Design Storms for more information.
Start Here…
To begin, click the [Rainfall] button on the Main Window Ribbon Toolbar “Rainfall” tab to open the Rainfall Wizard.

Then select the “Precipitation” tab on the Ribbon Toolbar. The Precipitation Manager screen should look like the following:
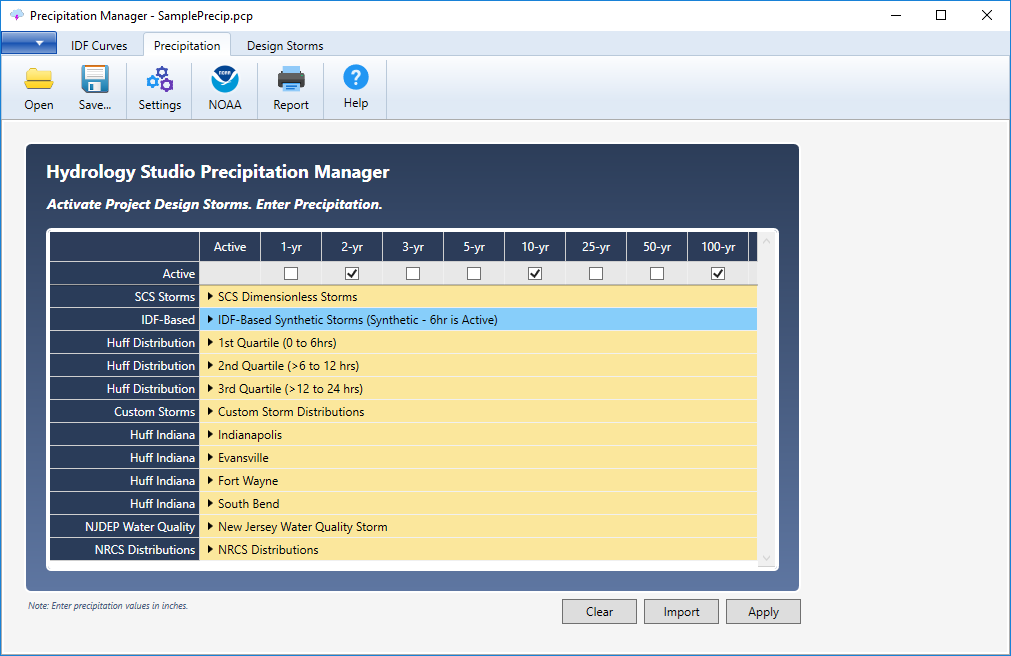
This screen basically needs to know three things:
- Which return periods you want your project(s) to use (Rational and NRCS).
- Which storm distribution you want to use (NRCS only).
- Rainfall precipitation amounts associated with Items 1 & 2 (NRCS only).
1. Choose Your Return Periods
This is where you set, or activate, the return periods you wish to always use. This applies to both Rational and NRCS hydrographs. The top row of the table lists the available frequencies. Just below that are check boxes used to activate those frequencies.
Simply check those you wish to always use. Uncheck those you don’t. The settings below mark the 2, 10 and 100 year events as active. The remaining inactive frequencies will not be used and will appear grayed-out throughout the software.

If you’re wondering why the return periods you want to use are not showing up in your results, revisit this screen and turn On / Off your desired frequencies.
2. Select Your Design Storm
When creating NRCS-type hydrographs, the software will need to know which design storm to use.
Click on the row header arrow corresponding to the desired design storm. This drops-down the list of available storms in that category. For example, clicking on NRCS Storms displays the following:
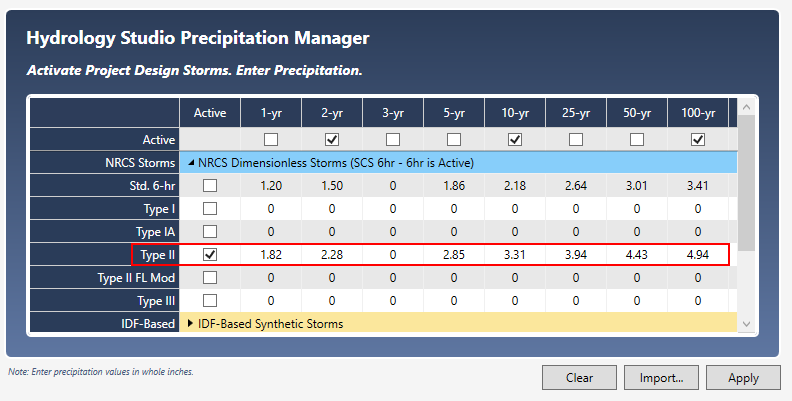
To activate a design storm, simply click its corresponding check-box under the “Active” column. To use the Type II, for example, check the box in the Active column next to Type II as shown above. Remember, only one storm can be active at a time so uncheck those you do not want to use.
3. Enter Rainfall Amounts
The last step in setting up your rainfall is specifying the rainfall amounts local to your area. These are then applied to your selected Design Storm when you create runoff hydrographs.
There are three ways to accomplish this step:
- Download a ready-made .pcp file from RainMaps™
- Enter the rainfall amounts manually
- Import from NOAA’s National Weather Service “Precipitation Frequency Data Server”
Enter Rainfall Precipitation Manually
To enter manually, simply type in the rainfall amounts associated with the selected design storm and frequencies. A sampling of NRCS Type II rainfall amounts is shown in the screen above in Step 2. For example, the rainfall amounts for the 2, 10 and 100 year events are 2.28, 3.31 and 4.94 inches respectively. When finished, click the [Apply] button.
Save your rainfall by clicking the [Save] button and specifying a name for your file. A “.pcp’ extension will applied. This file will automatically open each time you launch Hydrology Studio. You can change this file any time afterwards.
Done
Simply close this screen and return back to the main window. There’s nothing else you need to do. From this point forward, each runoff hydrograph you create will automatically use this rainfall data, return periods and selected design storm. There’s no need to re-enter this data.
You can, of course, return to this screen at any time to edit and choose other design storms as well as activate other return periods. Click the [Open] or [Save] buttons to open or save an existing .pcp file.